

I know your users asked you:
"What is wrong with this record? Why can't I submit for approval?"You want to make it easier for them. If only there was a way to show them when and why a record can't be submitted for approval!
I'll start by assuming that you already know how to build an effective approval process.
If you need more guidance on building an approval process you can check out Salesforce User Manual or at the following Blog Post.
If you need more help or think I should write more about setting one up, please feel free to reach out or post in the comments.
Now that we got that out of the way, a couple of requisites:
- You have an approval process that has some entry criteria (only records meeting it can be submitted for approval)
- You have control over the page layout of the record in question
The biggest problem with approval processes is that users just don't always know what are the entry criteria, and when they try to submit a record for approval the only feedback they get is "Unable to submit for approval" - NOT useful at all.
A great way to help your users is to create a formula field that will alert them to which requirements are not met.
In the example below, I have a simple approval process on the Opportunity object with only two criteria:
- The Opportunity's probability must equal 90%
- The Opportunity's approval status (custom field I created) must equal 'Not Submitted' or 'Rejected' (an approved record or one that is in approval process does not qualify for submission)
The Approval process looks like this:

Let's go ahead and create a Formula field on the opportunity object and call it 'Approval Eligibility'

Give it a name and select formula return type as 'Text'

Writing the Formula
- Since we want each condition to be evaluated separately, we will enclose every condition inside an IF statement, where the True part of the if statement contains the message to be shown when the record is NOT eligible.
- Since there can be many conditions, we will also add to each of the messages (except the last one) a line break in the form of BR().
- The false statement of the if condition will have an empty string so that no message is displayed if the record IS eligible.
- Finally, we will include an & sign after closing the IF statement to indicate that there is another string to be concatenated with the test result of the first IF statement.
- We will repeat this for each condition that is required for Approval's entry criteria.
This is what the formula looks like:
IF( Probability <> 0.9, '-Probability Must Equal 90%'&BR(), '') &
IF( NOT(OR( ISPICKVAL(Approval_Status__c, 'Not Submitted'), ISPICKVAL(Approval_Status__c, 'Rejected'))), '-Approval Status Must Equal Not Submitted or Rejected', '')
** Pro Tip: before working on the formula, make sure you install the Salesforce.com Enhanced Formula Editor which I review on the post 5 Must Have Chrome Extensions for Admins (+1 for developers) **
As you always do, include a field description and help text
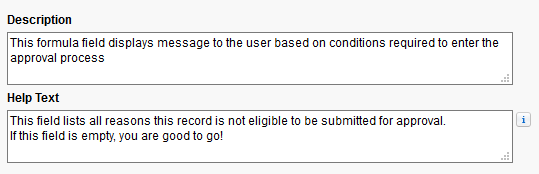
Save the field and add it to your page layout.
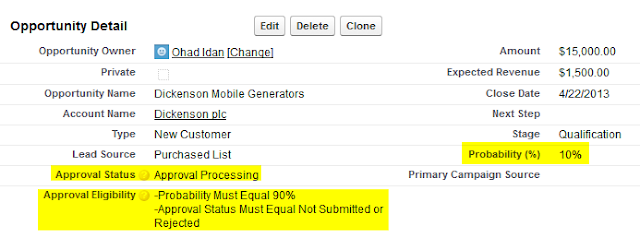
The End Result
Here is how the formula looks when only one condition is not met

And here is how it looks when two conditions are not met.
You just created one more reason for your users to call you

As you always do, include a field description and help text
Save the field and add it to your page layout.
The End Result
Here is how the formula looks when only one condition is not met

And here is how it looks when two conditions are not met.

You just created one more reason for your users to call you

No comments :
Post a Comment